Tag Archives: completed

Outfit Along Outfit Take 2!

4 Aug

Woah, guys, it’s been like a year! I’m not going to do a massive lengthy ‘sorry I’ve been gone’ post- I got a job as a teacher, I think that says it all. I have now quit said teacher job so life can resume as normal! In the year I was teaching I sewed a total of one dress and knitted some socks- that’s it! Teaching is time consuming.

So, on with the show!

This year I entered the Outfit Along again. Here’s last year’s entry (which was only like 3 posts ago!) If you need reminding or are thinking what the bloody hell is an Outfit Along then the idea is to knit a piece and sew a piece which can be worn together-an ‘outfit’ if you will.

I purchased the yarn for an apple green Hetty a long time ago but no knitting was happening so it sat and sat. This seemed like the perfect opportunity to use it. Finding fabric, however, was another kettle of fish. I had almost finished the cardigan by the end of June but still hadn’t ordered any fabric! I found this one on eBay and wasn’t in love with it but had nothing better so ordered it anyway. When it came I liked it even less so I put it off until the deadline day and sewed the whole thing just before cutoff.

Since I hadn’t sewn in ages I returned to the good ole Simplicity 1803. Unfortunately(?) I think I’ve lost a bit of weight since I last sewed it up so the bodice is a bit baggy which means this week will be filled with muslin-y goodness. (Did I really just say muslin-y goodness? Since when has making a muslin been fun?!) Other than that though it’s cotton lawn so it’s lovely and light which is perfect for summer and it floats around my legs nicely. Despite not initially liking the fabric, now it’s been sewn I love it!

Unfortunately I can’t count so I screwed up my button placement and have to redo them but it ain’t happening any time soon- I’ve got too much to catch up on!

Did anyone else join in the OAL?

The Outfit Along Outfit

31 Jul

Hey guys!
First off I would like to sincerely apologise for my absence of late. I’ve been busy getting a new job!
Remember in my goals post I said I wanted one? Well, I made it happen! I am now going to be a full on teacher, which meant a lot of my month was filled with planning, interviewing, all the fun stuff. But now I’ve got 6 weeks off and by golly will I make it count.

Have you guys heard of Andi and Lauren’s Outfit Along? If you haven’t, it’s kind of too late now as the deadline is today. Unless you’re some kind of super knitter or have Bernard’s watch. (God I would kill for Bernard’s watch) 

The idea was to create an outfit, 1 knitted, 1 sewn piece, that complemented each other and you would wear. A knit along and a sew along were hosted by Andi and Lauren respectively with official patterns and we were given 2 months.

2 months? I can easily make 5 outfits in that time……

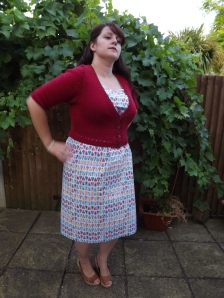
Turns out I did just 1. And here it is!

DSCF4738


The cardigan is the ‘official’ pattern- Myrna by Andi Satterlund. 

When she first announced the new pattern I was kind of meh about it. I didn’t like the short sleeves and it was all pretty boring. 

Remember when I said that about Miette?

Yeah… turns out I love Myrna! I lengthened the sleeves here but ever since I did that I’ve been thinking about how nice a short sleeve cardigan would be- that’s next on the list!

I knit this in Drops Karisma, Wine. I bought 7 skeins, planned it all out so I’d have 1 skein each for the sleeves, 5 for the body and it would be perfect. I finished and thought it was a little short but no more yarn and I can deal, only to find another skein!!

I keep telling myself I’ll go back and add some more ribbing but we all know I definitely will not do that. Once something’s done, it’s done. No takesies backsies. 

DSCF4746


The buttons for this thing took me bloody ages to find.

Did you know Minerva crafts have approximately 27902645782398365490 different types of brown button? I’m estimating, the figure might be a couple off.

But seriously, I think it took me at least 6 hours to find these buttons. Worth it though, they’re perfect! They’re these 18mm crendon buttons with little flowers on them and they’re so smooth and shiny.

And whilst we’re talking about buttons can we just add in how bloody ridiculous with them I am? Remember my previous button dilemmas? I had another.

The pattern calls for 5 buttons. 5. Knowing my previous disasters and thinking I had added in an extra buttonhole on the V, I ordered 6 buttons. 6, to be safe.

They arrived, I stroked their smooth shiny-ness for a while and went to attach them. How many buttonholes did I have? 7. 7 effing buttonholes. Just incase more buttonholes wanted to appear on me I ordered another 3 buttons. I sewed them all on and 7 buttons looked ridiculous! I showed Mark who doesn’t usually give a toss about sewing/knitting and he burst out laughing followed by ‘that’s made my day’

So I cut out every other one and how many buttons did I require? 

4.

Ridiculous.


Anyway, whilst I was ordering said buttons I ordered my dress fabric from Minerva too. It’s a balloon print polycotton that was like £2.99 p/m or something and you can tell. It feels very cheap and online it looked like it had a blue background but in reality it’s white. Still, not one to waste fabric, I made it up and I’ve had a few people tell me they like it so I guess it doesn’t look cheap from a distance (just don’t get too close or you’ll hear it crunch!)

I’m hoping it’ll soften up with a few washes and a tumble dry. 

The pattern is Sewaholic Cambie with a modified skirt. this is actually not the first Cambie I’ve made but the other one remains unblogged. The post is written, it just (altogether now) needs photos. This one only got photographed due to OAL time pressures or I’m sure it would sit for 3 months too. 

DSCF4745

I did an FBA on this version and spread the dart into 3 since I have to take in 6 inches through my waist. A 3 inch dart results in very Madonna-esque nipple action.

It’s still a tad big- I’ll admit to just eyeballing the darts which probably contributes to the bagginess but it’s a little loose down the sides too so on version 3 I reckon I’ll have it down. (And I will measure, I promise!)

Shall I tell you a secret?

I didn’t hem the dress. The selvedge isn’t selvedgy, no little holes, no weird pattern issues, it just stops so why make extra work when we all know I hate to hem?!

Oh, and I got Mark to take photos for me and he likes to mumble and not tell me what’s going on so I have some excellent outtakes for you

DSCF4740

I think I was in the middle of saying something like ‘can you actually pronounce some words and tell me if you’ve taken a picture please?’

DSCF4739

‘What? Open your mouth, have you taken a picture yet?’

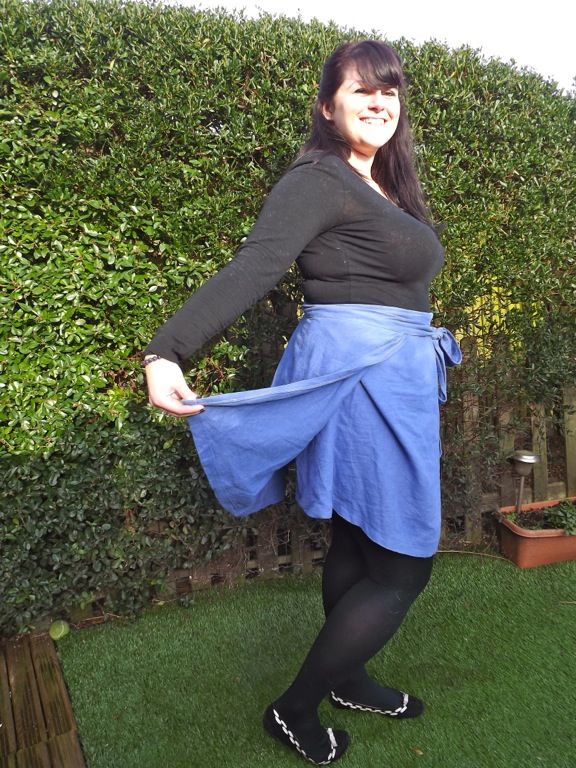
And finally, the classic stretch out the cardi pose

DSCF4742


Did anyone else join the OAL? 

Simple Daisy Dress

12 Apr

Question: do you name all your items of clothing? Cos that is way too much effort- I can barely name my pets myself let alone all my clothes. Patterns with a name are simple- Miette 1, red Miette, Black Kelly etc etc, this amalgamation of stuff however needs to be referred to somehow so it needs a name.

I digress- here’s the actual thing I’m talking about


I won this beautiful cotton sateen from Fabric Godmother in the giveaway along with a copy of By Hand London’s Georgia pattern, I think with the intention of using it to make said pattern.

As lovely as the dress is it just isn’t my thing- cups to amplify the size of my boobs? figure hugging? short? Na-uh.

Unfortunately I just had way too many ideas about what to do with this fabric but nothing amazing. Eventually I decided I needed a new dress and I just hacked into it before I had any real idea of what I was going to do.

I knew with such a plain fabric I needed detail…somewhere. Whilst researching ideas for the Hollywood Sewalong I had seen a lot of yoke embroidery and this appealed to me. It doesn’t really work in my proposed Sewalong dress so I decided to add it here.

So I knew I was going for yoke detail- that required yokes. I have 2 patterns with yokes- 1 button down and 1 wrap. I wanted my dress to have neither of these features so it was drafting time!

By drafting I actually mean I chopped off  the top of the Daisy bodice and cut out the yoke section from my button down.

The skirt was tricker than I had anticipated- I draped this thing several times before I decided to go with the box pleats. I took photos too and sat for ages flicking between the 3 trying to decided which one looked best!

Gathered?

Box pleats?

Lots of little pleats?


After I had actually decided what to do the rest of the dress was pretty simple- I used bias tape as a facing for the sleeves and neckline and double turned the hem.

At this point I had 1 hour until I was due at a family do and I still needed to shower! I hadn’t started making the dress thinking I would wear it that day but I was so close to finishing it would seem a shame not to show it off.

I had a radical idea with the embroidery- there was no way I could fit that into an hour and shower so I cut 2 flowers out of some lace I had and stitched those on instead.

I originally planned to take those out and embroider afterwards but I actually really like them the way they are- they add colour, detail and texture to an otherwise plain dress so embroidery will have to come in elsewhere.

I have three confessions to make with this dress.

1. I didn’t change my overlocker thread. Infact, I rarely change it so everything is overlocked in white!

2. I played with white animals which left fur all over the dress and didn’t wash it before photographing it.

3. I totally didn’t plan for any kind of closure as I just got so carried away with sewing it but luckily for me this is stretch cotton so it slips right over. Phew!

Owl never make this again.

16 Mar

Have you ever been really excited by making something, eager to finish it and then show it off to everyone only to be let down by the fact it looks absolutely terrible?

Guys, this happened to me and I kind of want to cry as well as drop-kick the offending item into oblivion.

Kate Davies’ Owls jumper is cropping up all over the inter webs. According to my Ravelry Notes I started this in April 2013 but you know how it goes with me and second sleeves so I put it away for a while. Seeing everyone else’s made me pick it back up and I powered on through to get it finished.

Except it looks awful. Look:

I think I just have too much boobage to pull something like this off. All of the attention is drawn there because of the yoke detail but the detail is kind of distorted by the boobs. Ignoring the stupid wind face here, look how much worse it looks from the side:

I’m also really pissed at the sleeves. You guys know I hate knitting them so I decided to make these 3/4 length. Only you wouldn’t know that! I put them on to measure them as I went and stopped when they reached my armpit, just as the pattern says, and yet when I’ve got it on now the sleeves sit longer than that, and yet not a full-length sleeve so now they’re a stupid weird length.

And then there’s the fact that bottom-up construction is the most ridiculous thing I’ve ever encountered. It is so difficult to knit the sleeves and body all in one go and also it leaves a hole! A great big gaping hole that you’re supposed to close up afterwards. What is that about?!

Anyway, none of this is the pattern’s fault. The pattern is actually quite straight-forward to follow, this is just down to stupid body shape and poor yarn choice. I can’t quite remember what I used but I think it was Sirdar Hayfield or something and it’s just too stiff and it doesn’t meld together. There are holes around the back and arm shaping which look awful.

The owls look awesome and my friend really likes it. I’m tempted to give it to her but I don’t know if I could give her something I’m not completely happy with.

Kelly the First

7 Mar

It’s skirts, skirts, skirts here at Makesphere towers. I’ve gone from wearing them maybe once a year to wearing them almost interchangeably with my dresses. Granted, they don’t suit me as much as dresses, but it does give me the chance to wear tops that for some reason I kept buying but had no reason to wear.

So here’s the third instalment of skirt central, my first Kelly!

Yup, I’m pre-empting again. I’ve got at least 2 more Kellys planned but they are going to require some work.

Pleats are supposed to be my friend. For my huge arse, pleats are a godsend because they allow me to still have a small waist and yet there’s enough fabric to cover said buttocks. These pleats are not my friend.

It’s kind of difficult to tell because the skirt’s black but the skirt is pulling, or rather I should say my bum is pushing its way out through the skirt and the pleats aren’t sitting very well at all.

I did add a bit of extra fabric to make the pleats slightly bigger to accommodate for this but obviously not enough so for like the first time ever I might actually have to make a… *gasp* muslin?

I mean I’m OK with the skirt. Like I said it’s black so it’s difficult to tell and people probably won’t notice anyway. But for my next two versions, this won’t fly at all.

Back on the positives though, I’m pretty happy with the pockets!

And, these were my FIRST EVER BUTTONHOLES!

I’m really quite pleased with them, I even Instagrammed this picture of them

Screen Shot 2014-02-19 at 10.49.05

(Please note that the second buttonhole has a chalk marking next to it, it’s just as good as the first really!)

The buttons I used are the ones I bought as a substitute for Hetty until I realised that they just weren’t as good as the ones I had. Luckily for me though, Hetty requires 7 buttons and so does Kelly. Poifec!

I used a black rayon/linen blend from Minerva for this version. It was quite easy to work with in terms of slippage but man does it shed. Black strands everywhere!  I seem to have made a habit of linen skirts lately, having never worked with linen or made a skirt prior to my first Miette! My next two versions are also going to be fabrics I’ve never worked with before but no more linen!

Speaking of which, what can you do with linen remnants? I have a bit of blue left from my first Miette, a bit of red from my second and now some black left from this Kelly. They vary in size but the blue one is close to a metre I’d say. Any suggestions?

Following the grain.

20 Feb

Aaaah, wasn’t Sewing Bee so good?! I just can’t contain myself to wait for the next one, I’m practically bouncing off the walls here!

Whilst we’re waiting for some more sewing goodness from the profeshs at BBC2, here’s my contribution this week.


Miette take 2!

You guys knew this was happening. I just attend too many dinners/all you can eat buffets to not have at least 2 Miettes in my wardrobe. Infact, it’s my sister’s 16th this weekend so I’m definitely going to be in need of a Miette.

This one was made in a lovely linen from Britex fabrics. I say lovely- it’s linen so obviously it wrinkles like a bitch, but it was nice to work with at least and it has a really nice drape.

Speaking of which, I totally fucked up this skirt to begin with. The front panels are supposed to be cut on the bias, which I did with the first Miette but this time around I forgot to follow the grainlines 😳

Being the person I am and hate having to repeat things I thought eff it, let’s carry on and see what happens.

GUYS, DO NOT DO THIS!

The end result is terrible- the front of the skirt just stuck out at almost a 90degree angle and gave me a pot belly.

Luckily, I had just enough fabric to recut the front panels. So I had to rip out the whole waistband- oh yeah, I really went the whole hog on this pot belly crusade-, then remove the front from the back which I’d already overlocked and restitch everything back in, basically starting the skirt again.

Knowing I had all of this to do I naturally put the skirt away for a couple of weeks because who wants to face that task?! But when it actually came down to it that all took me 20 minutes. Yeah.

So anyway, back on track with the proper construction, I changed a couple of things the second time around.

1. I graded the back panels down a little bit.

See in version 1 here

the back panel is creeping its way round to the front? I cut the largest size for my largest arse but actually my waist is nothing like that. As it’s a wrap skirt I thought that wouldn’t make too much difference but then the back panel comes too far round. I still wear the skirt, I’m not that bothered by it and it means I probably won’t flash my bits to anyone, but this time I graded it a little so the panel stays more in line.

See?


2. Eliminate all top-stitching. Top-stitching definitely has its place but with such a bright red I really wanted the skirt to stand on its own and not be ‘brought down’ by top-stitching, I just felt it would detract from the skirt as a whole. So I slip/prick-stitched both the ends of the panels and the hem and I’m much happier with it that way.


I also trimmed the waist ties at the ends into little points. No idea why, I just felt like it.

I’d like to mention the grill while I’m here: you may have noticed in the last couple of posts (and in some more to come) there’s a grill behind the bench.

These gale force winds have strewn our barbecue all over the garden. It did have a cover on but of course no cover is going to stand up to something that lifted our umbrella up and out of the table, and so that’s why the grill’s there. I’ve been having to collect pieces of barbecue from all over the place! But evidently I missed the grill.  No sausages for us this summer!

Hetty’s here!

18 Feb

It’s half-term, it hasn’t rained for 6 hours and I’m watching Dexter’s laboratory, what a fantastic day!

To make it even better, The Great British Sewing Bee starts tonight!!!! I’m seriously pumped for it, I might even get in some popcorn!

In other news, since it hasn’t rained for 6 hours I decided to photograph some way overdue projects (as well as some new ones) so I’m happy to present

DSCF3517

Hetty!!

Yup, I tackled those sleeves like a boss and they’re much more flattering now. The left one is still tighter than the right one so either I have a particularly fat left arm or something went wrong but not so much I feel I need to reknit again again.

DSCF3516

I lengthened it slightly: cropped cardigans work great for me because 99% of the time I wear dresses and it’s much more flattering to have one that sits at the waist, but my Agathas are just slightly too short.By the way the pattern was going I figured this would be the same length so I did either 1 or 2 more sets of the pattern (can’t remember because it was so long ago!) and I think it’s the perfect length. It’s not restricted just to dresses now and could equally be worn with skirts or trousers too.

All other construction was fairly straight forward- I’m pretty used to Andi’s patterns now and this one was super easy to remember so I didn’t even have to keep looking at my phone every 2 minutes. (Agatha was a bitch for that man. I remembered it eventually but sheesh. Talk about square eyes.)

I must also mention the buttonholes. My 2 Agathas do not have buttonholes. Both times I forgot to add them in and then could not be arsed to go back and add them. I don’t do cardigans up that often anyway so whatevs. This time  I totally remembered to knit in the buttonholes, all 7 of them, only to discover I only had 5 buttons. 😥

DSCF3524

I bought these at Walthamstow, not for this particular project otherwise I definitely would’ve bought 7, but they were just so perfect I couldn’t see any other buttons taking their place. So I had to sew up 3 of the buttonholes and just sew on 4 (for balance due to the already-constructed buttonholes)

I honestly don’t know why I bothered with the buttonholes!

Regular readers will know that I constructed both the dress and the cardigan with the other in mind thanks to a pin on Pinterest. These two were always destined to be together. So imagine my reaction when Mark tells me  “I don’t like the cardigan with that dress. They don’t go.”

Yup.

The Aurora Dress

8 Feb

Remember when I said I made the Best Dress Ever? Well I take it back. This is the Best Dress Ever. For reals this time.

I mean look at it. It’s super purple which is awesome enough anyway but it’s got freakin’ deer on it!!

I was hesitant at first to order the fabric (Michael Miller, Norwegian Woods if you’re wondering)- I loved it instantly but I wondered if it was a bit full on to make a whole dress from. I asked literally everybody I know what they thought and then said eff it and ordered it anyway. Maybe it is a bit much but I bloody love it!

The pattern is another adaptation of Simplicity 1803 (see here, here and here for other versions) I just can’t get enough! Despite the bastards trying to tell me I’m a size 20 and then make me bring it in by like 4 inches and the pockets which are designed to sit at the front (seriously, I say WTF to that every single time I make this dress) I do love the pattern.

I made my usual adjustments which were raise the scoop on the back neckline, put the pockets on the side and cut the front skirt as one piece as well as making a round neckline in which to add a collar!

I self-drafted the collar. I probably could have found a free collar pattern online easily but my Mac was dead and the charger was downstairs so obviously this was the easier alternative.

Mark and I just recently cleared out our bedroom- old clothes and stuff, and found a load of bedding from our old double bed. Of course I kept the sheets and that’s what I made the collar from! I think the colour is a perfect match, both for the dress and for …

…the ric-rac trim!

When I bought the sheets like 2 years ago I definitely didn’t consider the colour based on how well it would match the ric-rac on a future dress but it worked out perfectly!

Here’s the zip:

Is that ‘where?!’ I hear you cry?!

Exactly! The zip took me 1.25 episodes of Silent Witness to insert but I think it was totally worth it. I used the hand-picked zip method thanks to Tasia’s tutorial which is now becoming my method of choice. Looks neat, no faffing with the machine and easier to control.

A close up of the tiny prick stitches

And from the front

I tried really hard to make this dress look beautiful everywhere, with tiny little details so I did absolutely no top-stitching anywhere.

I tacked down the neck facing with tiny prick stitches on the outside and a slip-stitch through the facing. I did the same with the hem and the bias binding on the armholes. I think it’s made all the difference and just makes the whole thing look more polished.

It’s so comfortable. I feel like a superstar or something walking round in it because it sort of floats about and the fit is perfect for me. I’ve had issues before with the sleeves being too tight but I fixed it this time and there’s enough movement without bagginess.

Mark took these photos for me as I thought a proper dress deserved proper photos. We took them whilst we were dog-sitting for his Aunt and the sun finally decided to grace us with its presence. Of course the dogs wanted in on the action, so I feel they deserve a mention.

Miette take one.

2 Feb

Yep, I’m pre-empting. You’re probably aware that I’m not one for skirts. I quite like the idea of them, indeed they look lovely on other people, but they never really suited me.

I was tempted by Tilly’s Miette, but I was equally worried that I’d make it and never wear it. Then I won the pattern and a good fabric to make it from in the Stitcher’s Dream giveaway and decided to take the plunge.

I’m so glad I did!!!

Granted, it might make my hips look a bit bigger, something I really don’t need any more of, but it’s so comfortable, easy, versatile and even better, adjustable! This makes it the perfect skirt for wearing around Christmas, out to dinner, all you can eat buffets…. I’m sure Tilly didn’t create the skirt with all you can eat buffets in mind but it’s another selling point I think she should consider.

As I mentioned, it’s super easy! I think the whole thing took me a couple of hours, maybe 3 at a push, which included hand stitching the waistband.

Another awesome thing is that the back panel overlaps a lot. Very useful with these gales we’ve been having!

I think you can probably tell that I’m completely sold on this pattern! I’ve got two more Miettes planned, one of which the fabric is on order for (eeeee!) and will be whipped up as soon as it arrives 😀

This particular one is made from a cotton/linen blend from Backstitch in Amparo. My next version is going to be red linen. I’ve not worked with linen before- don’t like the idea of wrinkles- but the blend made it look less 80 years old and more 40 or 50. I can deal with middle age linen.

Agatha v 2.0

6 Dec

Wow.  According to my Ravelry notes I started this cardigan on the 18th August. That means it’s only taken me just over 2.5 months to finish this thing. I know people can knit things a lot quicker but we all know how I have several WIPs (some people like to call these UFOs but they’re definitely WIPs 😉 )

So considering in that time I’ve knitted 2 christmas gifts along with 1 sleeve from another WIP and I BLOODY HATE KNITTING SECOND SLEEVES I’m pretty darn pleased with it.


DSCF0746

(Pahaha, this looks like a school photo!)

I just powered on through that second sleeve. I finished the first and thought to myself if I don’t cast on the second sleeve now it’ll sit for 6 months like the last one. So I bloomin’ did it. I cast on that second sleeve and knitted the cap. Then I just kept going. I remember actually sitting there moaning and cursing about the sleeve as I was knitting it and almost crying when I measured it against the other and still had another inch to go. Oh the woes of a modern life.

The wool is Drops Karisma and it’s lovely and soft. It’s a tiny bit thin for the Agatha so I had to fiddle about with needles and tension a bit to get the size right. It still knitted up a teeny bit small but I blocked the shit out of it (using my regular carpet method) and I think we’re good to go.

DSCF0756


I don’t have much else to say about it really. Knitting it the second time was much easier although I’m struggling to find things to pair it with due to the colour so it’s not getting as much wear as I’d like.

Anyway, I’ve finished knitting Hetty! I’ve got to find some buttons for it, which is proving tricky, but then it’ll be up!

chinelo bally

Dressmaker| Author| Blogger| Freehand cutter

Sybil Q knits

going wherever yarn goes...

knit the hell out

More obsessed with each passing stitch.

The Sew Convert

This is my blessed life. Family. Sewing. Travel. A simple blog by a sewing convert.

Sew Busy Lizzy

she sews by the seashore...

Tanit-Isis Sews

because my fingers itch...

male pattern boldness

A blog about sewing, knitting and whatever else comes to mind

Handmade Jane

A blog about sewing, knitting and whatever else comes to mind

Rittles and Bittles

A blog about sewing, knitting and whatever else comes to mind

Frocks & Frou Frou

A blog about sewing, knitting and whatever else comes to mind

The Dressmaking Diaries

A blog about sewing, knitting and whatever else comes to mind

Gertie's New Blog for Better Sewing

A blog about sewing, knitting and whatever else comes to mind

Vixen Vintage

A blog about sewing, knitting and whatever else comes to mind

Tilly and the Buttons

A blog about sewing, knitting and whatever else comes to mind

Makesphere

A blog about sewing, knitting and whatever else comes to mind